Thursday, December 15, 2011

Artist Post-Chris Saah


One of the artists that I decided to review on was Chris Saah. This former St. Mary’s College alumnus is a digital photographer who graduated with a philosophy major. Luckily I was able to have him as a professor this semester and therefore got a chance to really engage myself within his comments and work. Chris actually lives in Washington, D.C. but he traveled down here frequently to teach classes. After he graduated from the college he actually got an internship at the National Museum of American Art and then started working as a designer for different organizations and groups. His work actually involves the layering of several images together and then going through a process of mounting lights to create a deep space that seems almost unreal. By using tinted light Chris is able to create the perfect tone and hue for areas that he’s interested in exploring further through the photograph. In Photoshop he takes several images and starts to morph them together, washing out the color in certain areas and increasing it in others. This effect allows for his final prints to look surreal and as if they were set up. In a sense though, they were set up, which is one of the main things that I’m not too interested in. Although his final prints turned out beautiful, most of them seem to resemble a toy or put together stage for dolls. For example, in his print Displacement 12v, there is a lot of blurring of the foreground and background, and a meshing of yellow and brown hues that create an unreal depth to the photograph. It amazes me how just in Photoshop he can create a new landscape out of several, I just wish a lot of them didn’t look so staged.


Some inspiration that Chris left us with is to simply just shoot photographs and then make work out of your outcomes. I think that by this he wants his students to just have fun with the medium and to simply go and explore different methods and areas before even realizing what you truly want to work with. Overall I think that Chris’ method of working is quite different from me and my film photography, but I think it’s an interesting dive into the digital realm of photography. Even though I’m not a fan of digital work persay, I found his work to be a bit inspirational. The new worlds that he creates are evident of his philosophical background and the meshing of two or more spaces shows his exploration.

Artist Post-David Ellsworth

For my artist lecture, I wanted to do my post on David Ellsworth and his video work that was displayed to us in class. I wanted to go outside of the traditional artist lectures that are given on campus and focus on a more prominent artist that we are surrounded by each day. A little bit of background information, Dave Ellsworth lived in New York for some time before moving down here to Maryland. He worked as a film and TV editor at Broadway Video, Inc., which he says wasn’t the best job but it helped him learn the business. Working primarily with super 8 films, Dave says that Susan Sontag and her writings heavily influenced him. Although I’ve read many Sontag writings before, specifically On Photography, I always found it hard to understand and connect to, so it was interesting to hear that such a philosophical and theoretical writer influenced him.
One of the first videos that Dave showed us was a music video he had done for a band called tortoise. The video shot in 1998 incorporated a lot of repetition of images and it was all set to the rhythm of the music. One specific thing that I remember about this video is the humanoid feel that was presented to such manmade objects. I think a lot of this had to do with the pace of the video and how it seemed choppy and stop animation like. The second film that we were able to watch was a sort of documentary of a junkyard with moving machines and its general daily life occurring. Being about 20 minutes long really allowed me to see how much footage has to be edited down to create such a long movie. It makes me wonder about longer films and how people create 3 plus hours of footage. Being in the junkyard felt really machine like, not only because of the giant machines moving around but because of the sound. There was no real dialogue in the entire film except for when a worker starts to give a quick, short demand to another co-worker. All of the other sounds are the grinding and scraping of machines against metal, which can be a bit disjointing. I had never seen a short film like this before and I thought that it worked really well with the subject matter that was being recorded. Something like this isn’t too interesting to normally view, but in this context it seemed to become a way of life for everyone and everything around there. Later in the discussion David explained to us that this area is heavily involved with steel and other metal and the steel mill life in general. It really makes you see the area for what it is and how rarely we see areas like this.
One interesting fact about his work is that for the second movie we watched, he only used one mic and one camera. He had to move the shotgun mic around the area to capture the sounds from each direction, which allows for some footage to be pretty muted and other footage to be really loud. Also, he told us that to get into this area, he simply emailed the company and asked it he could do some footage. Surprisingly the company said yes as long as he wore the protective gear (hardhat.) This is a reminder of how if you simply ask someone if you can produce artwork from or out of his or her place, how easy that can actually happen. Overall, I think that Dave’s work is extremely interesting. I’ve never experienced film like this before and it really gave me inspiration to finally start experimenting with my own film. Being a photographer, I find it really interesting to see the movement behind all of the still prints that occur within life, and it seems like video is the one medium that can help capture it.


From his film Time, and the River.

Artist Inspiration for final project-Heather Ujiie & Bonnie Lane


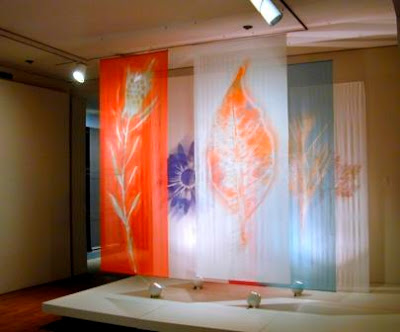
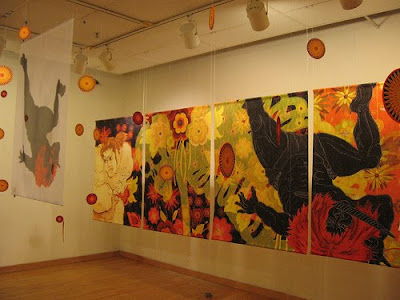
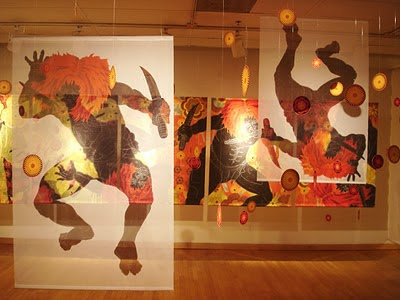
For this final project, I found it really hard to find any inspiration from specific artists. I was originally influenced by Sally Mann’s work on her Deep South series of photographs that she took down in Louisiana and Mississippi, but I wasn’t sure of another artist that inspired me. Mann’s photos were one of the main things that I was interested in exploring further, simply because her “deep south” is almost like the deep south here, where there’s still a lot of negative, war history. Although I found her work to be inspirational, I wanted to find another artist whose work was related to my own. I found that there wasn’t just one artist that I found interesting, but many. The first artist that I came across was Heather Ujiie and her work “Ninja Warrior Face-off.” This work was a series of large digital prints that were on hung pieces of fabric. Her imagery that is used within her piece is influenced by a source far from my own, Kung foo movies and comics. Although the subject matter isn’t the same, the process was for me. I really liked how each of her prints covered the entire piece of fabric and allowed for a full bleed of the work. Also, I was inspired by the type of fabric that she uses, which is a very see-through, flimsy type fabric. It seems to resemble a sort of linen or mesh type material, but I couldn’t find out specifically what she used. Regardless, I found it to be really unique. You could see the images that were hung behind her prints through the prints in front, making each layer or section of work connect to one another. This is something I wanted to do with my artwork, have the fabric be sheer enough so the images outside could be seen on the inside, through the fabric. With this particular work, she actually embroiders the image with thread after she digitally prints it onto the fabric. Her method of stitching is far from what inspired me, but I really enjoyed how it added a handmade quality to each of the large hangings.


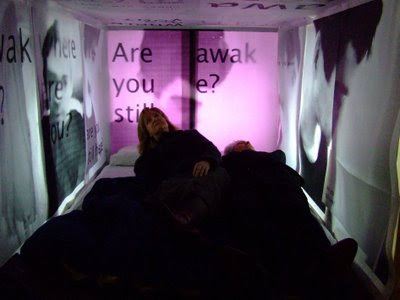
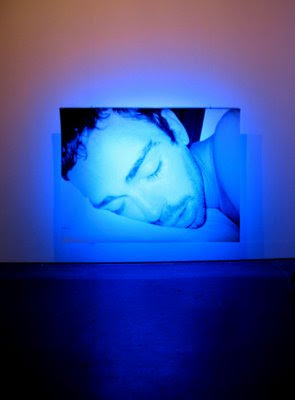
Another artist that I came across was Bonnie Lane. This artist has specific works that also involve digital prints on fabric. Once again, I wasn’t so much interested in her content but more in her process. Her work entitled Every Time You Sleep You Leave Me was a large digitally printed photo on sheer cloth of a sleeping person’s face. Her work also has a sound component of a person breathing while they sleep. Although she has a blue light cast upon the print from afar, her printing technique is very interesting. Like Ujiie’s work, she has printed full-scale photos onto the fabric and hung them in a setting where light can come through the print. Even though her light is artificial the concept still remains the same. Her work Are You Awake? also has large scaled prints but this time with actual text showing through the fabric with colorful lights. One thing that I really like about her work is the artificial light. I was most interested in natural light and how that plays a part into seeing the print like you would in the outside world. Though I think that the aura that colorful artificial light casts through certain materials is beautiful. It really creates a unique glow, especially with black text in front of it. I think that for any of my future project’s I could possibly project text through pieces of fabric with colored light to create this two-toned look. One quote from her that I found particularly interesting was My work is all about showing what I have experienced or known personally but I aim for the audience to be able to relate to it on their own level and somehow put a bit of themselves into the work and create their own story.” This is really how I felt about my work this time around. I knew that a lot of people didn’t know much about Point Lookout but I wanted them to have just enough history to make their own stories up within the context of the negative history that’s occurred there. Regardless of whether or not they’ve experienced it personally themselves, I think that my audience should be able to relate to it through the experience that they have when looking at my prints.


Although I didn’t really find one specific artist whose work was similar to my idea, I found a lot of artists who were all incorporating parts of my idea. I’m really glad that I got the chance to experience other artist’s work before actually creating my own so I had a clear idea of what would look unique and what wouldn’t. I found that using embroidery isn’t always the best option, especially on digitally printed fabric. I also found that projecting certain light through certain fabrics could create effects that no natural light could ever produce. Lastly, the aesthetic of each print was something that I found interesting within both artists. Each artist also have an extensive body of work, especially on fabric printing that I found to be really unique. Although most of the work is unlike mine, the colors, shapes and designs of each print are favorably unique.


Monday, November 14, 2011

Final Project ideas

For this project i'm not quite sure what I wanna do...it has to incorporate alternate printing techniques which has a huge field of possibilities. I have some ideas, but at this point I haven't had the chance to experiment with anything, since it has to deal with the printing process and not necessarily the subject process. I was thinking about keeping the same photos from the first project, the ones of Point Lookout with vaseline smeared on the lens, but printing them in a different way.


One technique that I saw was printing on cloth, which i think could be a really neat way to print, but might also be a bit expensive depending on the process and cloth needed for the work.


One thing though is that the process of printing on fabric seems a bit daunting..it sounds kind of hard but probably would be easy after doing it once... "If you search on the web you’ll find a number of sites that tell how to do this on small, dye-based inkjet printers. The instructions generally run: either soak the fabric with a product called Bubblejet Set, or a home-made recipe of soda wash and fabric softener (this is to remove the sizing and prepare the material to accept the dye ink); hang to dry; iron onto freezer paper (the freezer paper supports the fabric as it goes through the printer and will easily release the fabric after printing); rinse the printed fabric in water with fabric softener to set the dye, then hang to dry." (reality tourist.wordpress.net)


Another option that i was thinking of was printing on canvas. I know this isn't anything new but I've always wanted to print on a material that really makes photos look professional and neat. With my subject matter i think it would work great. I'd also like to print bigger if i choose this option, probably a bit bigger than 11X14, since i've already tried experimenting with that size. Printing on canvas doesn't seem that difficult, but it sounds like i'd have to send it out if i don't have the right materials. I'm still looking up information on the process but this is one of my better options.


One last option is to try printing on glass. I've always wanted to incorporate Sally Mann's wet plate collodian printing but since getting some of the materials is rather hard to get (ether, etc) I wanted to try and incorporate other ways of printing on glass. I could use the technique that was shown to us in class which I honestly want to use as a fail-safe so I don't have to print anything out on the printer first...but if I can't find any other technique i'll just stick with that.


Out of all of the techniques I think i want to stick with printing on fabric first, then canvas, then glass. Depending on the difficulty level hopefully one of these options proves to be a new and exciting way for me to print my art.

Thursday, November 3, 2011

More objects for zombie game

Here are more updates on the objects that i've been creating for the game..


A computer chair:


Counter:


dryer:


bait:


There are more objects but my partner is creating some as well :)

Game design update

This project is really starting to come along as far as the designing aspects go. The only thing that really sucks is the communication between teams. I wish that we had an entire semester to do a project like this so that I could add a limitless amount of detail, but I think that since the game is 8bit anyway, detail isn’t too important of a factor. The game designers said that they liked the characters, but that they would like to see a military type person, a scientist and a regular character. I had already created a regular looking guy character so I decided to get working on the military and scientist characters. Here are the sketches for what they look like:


Scientist:


Military guy:


And this is what they look like after they are colored!


Now all I need to do is create the characters in different poses (I’ve already done this step) then add a hot pink layer to the background so that it acts as a transparency for the objects and characters.

This is an example of what they all will look like before sending them off.


As well as each character I had to design some of the objects in the game as well. This includes random objects like a t.v, bush, a computer, etc. Although, I’m finding it harder to create objects that resemble the same sort of style as my characters do. I’m adding the black outline to objects but it doesn’t necessarily fit like it does with the characters.


The final results should look really well and then I will send each object as a single file to the team (this is already done too!) ☺

Artist inspiration-Aaron Garbut


Although I didn’t necessarily look towards any artist for inspiration in creating the videogame art for this project, the artist that I found to be the most influential for this was Aaron Garbut and his work on the Grand Theft Auto videogames. Garbut is a videogame artist and the artist director at the company Rockstar North. Although he is most famous for his work on the Grand Theft Auto series Garbut has done other work on the videogames “Manhunt” and “Tanktics.” He started doing work ever since the first GTA game came out in 1997 and has since been working on the series for this game, with the latest being “Grand Theft Auto: Episodes From Liberty City.”


Even though my artwork for this videogame project honestly looks nothing like Garbut’s, I really liked the way he actually went through his process of being an art director for the game artwork. In several interview’s he states that at the beginning of the game creation there is just a lot of random ideas, characters and other media that doesn’t necessarily fit into the final game, but that all of this is an important process in creating the final artwork for the game. This reminded me of way me and Michael felt at the beginning of this project; not knowing what kind of artwork to create and generally just having a bunch of random ideas that we hoped the game creators would like. Garbut states in an interview with CGsociety “we have a bunch of ideas, elements of the story, the characters, locations, the general tone, gameplay elements, technology, mission ideas, and we just mix it all up and see where it goes trying to steer it along the way. It's all a big scary tangled web. But it works”(cgsociety.org.)


One of the main things that attracted me towards Garbut’s artwork was his use of thick black lines around objects and characters. When I created the characters for the artwork of this game project I originally just added a thick black line around everything, not for any particular reason but just because it felt natural. In Grand Theft Auto the artwork also has a sense of light to every scene. Although I couldn’t really work with lighting too much in the game, I liked how everything in GTA had a real but almost cartoony look. Garbut help create this aspect of the artwork along it’s development more with older versions of the game. Even though he helped create this along with newer games, there was more of a focus on making everything look real in the later games and therefore the thick black line was barely used.


There is little known about Aaron Garbut but his work on the GTA games is widely recognized. Although he oversees all of the visual elements of the game creation a lot of his ideas are used in the final versions of these games. His use of thick black lines and his lighting effects are two of the main aspects of Garbut’s work that I find interesting. Also, his use of color is also used well throughout every series. Not too bold of color but enough to create an emotional response in its players. For example, even though this plays into the lighting affects as well, the dim-lit, cityscape backgrounds helps play into the main character’s actions and responses.Also, the use of a lot of solid colors is something that I wanted to apply to my artwork as well. Overall though, I love his style of game design artwork and I think that for future projects, with more time I could incorporate more of his ideas.

Thursday, October 13, 2011

Outbreak begining sketches...

For the game Outbreak, I've designed a few zombie and human drawings, just sketches to see what would work. I plan on drawing a few more human figures though just to have some variety...i figured more of the 8bit style would fit with the Human 1 (guy with hat) and characters like the other zombies and humans would fit into the cut scenes...

you can click and zoom in to see any detail...

(if any of the game designers would like to have a jpg of the image sent to them just let me know! ^_^)


Monday, October 3, 2011

computer space reading

While reading the article on computer space I found the idea behind space in computer programs to be really interesting. I play video games, but not a lot, so to think of space in a digital realm is kind of difficult for me. Though i really think this article helped me to understand a few key points. For one, i didn't know what sprites were. When i read the article i found out that they were just 2-d animated objects and characters, kind of like "pac-man" and "space invaders." The idea behind the name still confuses me a bit but i've definitely seen examples of this in several video games. Also, the idea that by simply adding shadows and reflections to characters/sprites can turn a 2-d space into a 3-d space is really interesting. I think it's funny that since there are basically two mapping planes being put together to create the game, the characters and the background, the system can't tell that it's to different layers, and therefore a 3-d space. It represents it as 2-d, not 3-d which makes the entire game seem flat.

One quote that i really enjoyed from the reading was "the space medium is objects mapped onto space." I think that this quote is trying to say that the space created in different mediums is nothing more than a background of space with objects laid overtop of it. It makes sense though, if you take a background, and lay objects overtop of it with shadows and reflections, our eyes are trained to see those objects in a spacial field. We instantly give these objects a positon and place on the background that they sit on top of. This even changes with the spacial field in videogames where, like the reading states, different levels, rooms and corridors can also lead to separate spaces. The more objects that are placed within different realms and levels, the more space is created.

Although i found a few helpful tips within the article, i also found a couple of things that i'd like to know more on. Such as polygonal modeling when creating 3-d worlds and a "3-D scene being a VRML-list of separate files." Overall though, i think that the idea of space in a medium that's essentially represented to us as 2-d (old games, pac man..etc) is pretty interesting, and that by adding a shadow or two i can turn this 2-d space into a 3-d space similar to reality.

Tuesday, September 27, 2011

Project 1 experimentations


I finally got some vaseline and it really ended up looking pretty cool overtop of some of the prints. I went out on a road trip and just took some shots along the way to finally try out the filter. My theme wasn't decided at this point but i eventually wanted to do works that incorporated Sally Mann's idea of a human presence in historic southern areas. Thanks Billy for coming up with the amazing idea to shoot at Point Lookout!


Monday, September 12, 2011